How to...
Create new file
Just go to menu File - New...
A dialog appears. There you can select the main feature (the avi/divx file that
is the main movie).
After selecting the file, a new dialog appears. In that dialog you can see all
the tracks (video, audio, subtitles) that the file you select have. There you
can optionally update some infos about the audio and subtitle tracks.
1. for audio tracks (if you have more than one audio), its good to type the
language that the audio is.
Use this format: "audio - <language code>", where <language code> is a 2 chars
code that identifies the language that this audio track is (for English this
code is "en"). You can find codes for other languages at dialog Options.
2. for subtitle tracks type the language at this format "subtitle - <language
code>;<type>". You don't need to do this if you use Sub2DivX utility to add the
subtitles to you movie. Sub2DivX will do it for you.
<language code> is same as above
<type> if the type of the subtitle. Possible values here are:
| Code |
Description |
| 01 |
Other |
| 02 |
Normal |
| 03 |
Letterbox |
| 04 |
Wide screen |
| 05 |
Full screen |
| 06 |
Closed Captioned |
| 07 |
Forced |
| 08 |
Karaoke |
| 09 |
Not Specified |
| 10 |
Large |
| 11 |
Children |
| 12 |
Director Commentary |
| 13 |
Large Director Commentary |
| 14 |
Director Commentary for Children |
| 15 |
Normal Captions |
| 16 |
Large Captions |
| 17 |
Children's Captions |
Create chapters
To create chapters just press F9 (or menu Features - "Create Chapters for
title...") and a dialog appears. There select the title (movie) you want to
create chapters for and after select way chapters will be created (every some
minutes or type exactly the number of chapters you want).
CAREFUL, in order to work the chapters, at least one menu must be present.
Create menus
Hit F7 (or menu Features - "Add Menu..." or use the button at button bar) and
a dialog appears.
1. First you must select the language that this menu belong (if DivXMediaBuilder
has not all ready select it for you).
2. After must select the video file for the menu. Hit the button "from avi" and
select the video file that will be played for this menu.
3. The other options there are easy to understand. Also you may type a name for
your menu.
4. At the end hit the Ok button and a new <DivXMediaMenu> node will added to the
LanguageMenu you have select at step 1.
Click this new node and you will see the 1st frame of yours video file. Also the
Menu and Button properties windows will appear.
Above the area your video appears, is a new tool bar.
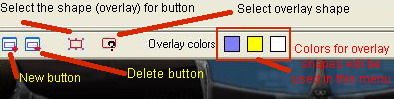
There you will find the "New button" and "Delete button" buttons. Use them to
draw or delete buttons for your menu.
After is a button to select (make active) the shape (overlayID) for active
button. Overlays are the shapes that shows a button has the focus. There are
some overlays that comes with the program, but a user can create their own.
Check out this tutorial about how to
create overlays.
After is the button that can select what overlay the button will has. So a menu
will pop up and you can select one of the overlays (bmp files) that are located
at "<DivXMediaBuilder folder>\overlays" folder.
At the end is 3 color buttons. Use them to change the 3 colors maximum that
overlays can have. Please check the above tutorial to find out more.
After adding some buttons will have something like this:
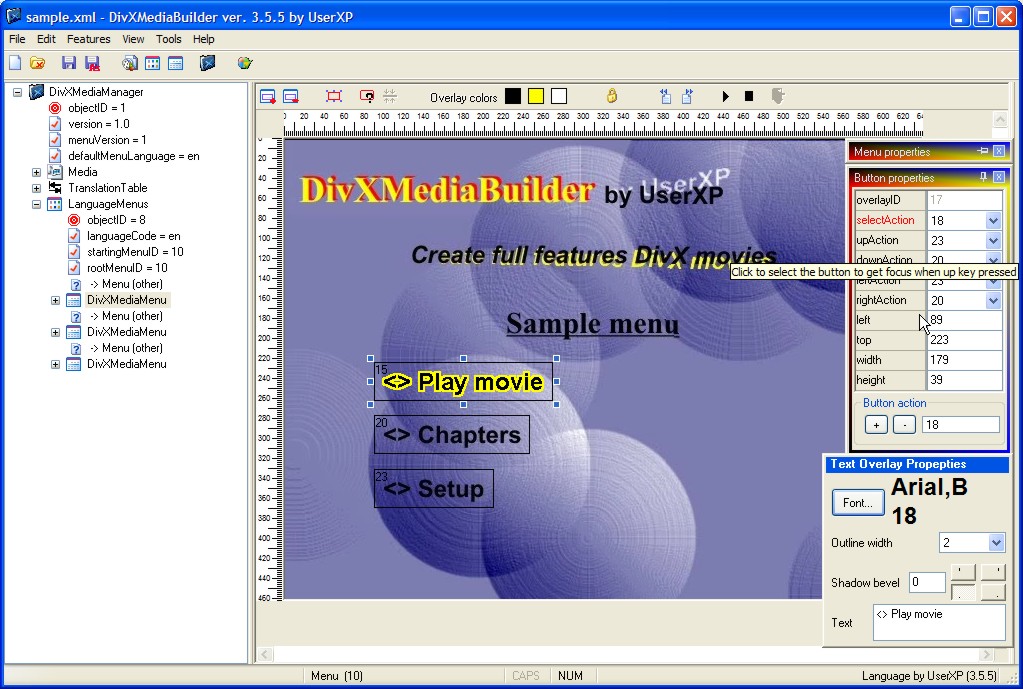
At the "Button properties" window, we can see all the properties for the
active button. No need to type anything there, but you can if you want.
Only the selectAction is required in order the button to work ok. Hit the +
button at bottom of "Button properties" window and at the dialog that appears
you can select what actions will be performed if this button is pressed.
The upAction, downAction, leftAction and rightAction defines the buttons will be
selected if user press the up, down, left and right buttons at remote control
(or keyboard). An (very) easy way to do this is to click upAction label. The
color turns to blue and you are at the "select button" mode. When the mouse is
above a button you will see a hand and you can click the button to get focus if
up key pressed. After this the downAction turns to blue and you can do the same.
Other things are self explained.
Of course you can resize and move buttons as usual.
Right click at buttons will pop up a menu.
Add title
Hit F6 (or menu Features - "Add Title..."). Follow the instructions at
Create new file
Add Language Menus
Language Menus contain menus formatted for a given language. Just go to menu
Features - "Add Language Menus..."